Stir Fried Pork Belly with Kimchi & Tteokbokki

This recipe save me many times as it’s so easy to put together and a very quick way to get a meal ready. Totally perfect for those days when I worked late and still want to feed the kids with some home cooked food or the don’t-feel-like-cooking but everything-outside-are-expensive days. 😀

You can either serve this dish with a bowl of warm rice, or eat it with lettuce or perilla leaves – wrap the meat & kimchi with the vegetables.

I did not add chilli, but if you prefer the spicy version, you can add Gochugaru (고추가루) during the stir-frying process.

Stir Fried Pork Belly with Kimchi & Tteokbokki

An easy and quick way to serve a meal during busy days. Best with a warm bowl of rice or wrap with lettuce or perilla leaves.
Prep Time 5 minutes
Cook Time 15 minutes
Course Main Course
Cuisine Korean
Servings 4

Ingredients
  

  • 300 g Pork Belly thinly sliced
  • 1 Red Onion thinly sliced
  • 8-10 Tteokbokki Stick Type
  • 1 cup Fermented Kimchi & Brine more if desired
  • 2 tpsp Cooking Oil
  • 2 tbsp Korean Soy Sauce
  • 1 tpsp Sugar optional
  • Roasted Sesame Seeds

Instructions
 

  • Soak the frozen tteokbokki in water for an hour. Drain and set aside.
  • Heat the pan (medium heat) and add 1 tbsp of cooking oil.
  • Add the tteokbokki to "pan-grill" until they are slightly brown on the outside. Set aside.
  • Heat the pan (medium heat) and add 1 tbsp of cooking oil.
  • Add the sliced onion and stir fry until soft.
  • Add the thinly sliced pork belly.
  • When the pork belly is about 80% cooked, add the tteokbokki back to the pan.
  • Add the fermented kimchi & the brine. Mix well.
  • Season with the soy sauce. If the kimchi brine is too sour, you can add sugar.
  • It's done! Garnish with sesame seeds and serve!

❤️ Ingredients I use ❤️

Sliced Pork Belly ➡️ https://shope.ee/VWmXrumBc

Tteokbokki Rice Cake ➡️ https://shope.ee/Atw9fCPhY

(Alternative) Fermented Kimchi ➡️ https://shope.ee/1fijwhUhdY

Korean Soy Sauce ➡️ https://shope.ee/5Kc2JYmycS

Roasted Sesame Seeds ➡️ https://shope.ee/4zzBzyL0YD

K-ART Wok ➡️ https://shope.ee/6AAgSGi55N

I may receive a small commission for purchases made through these links and its at NO extra cost to you! Thank you for supporting my work!

Tom Yum Cream Pasta Cooking Video

I created this tom yum cream pasta in 2016 and I love how delicious it turn out to be.

Finally did a video on this recipe and it’s really so easy to make. Unlike some creamy recipes that will give the Jelak (cloying) feeling half way through the meal, this creamy pasta will make you finish the whole serving and probably crave for more.

Do let me know if you love it as much as we do 🙂

Kids Friendly Korean Banchan Braised Quail Egg

If you had watch KDrama “Its OK not to be OK” on Netflix, this is the Korean banchan / side dish that Ko Moon-young loves with her rice. The drama made me want to try these braised quail eggs too!

It is also hard to find kids-friendly Korean side dishes which my kids will enjoy. I made these braised quail eggs the non spicy way as my youngest girl is still not very good with spicy food.

I use precooked quail eggs that comes in a packet (or sometimes in cans) as they save me so much time. You should be able to find them in your supermarkets too.

Do check out the YouTube video for the steps, and subscribe to my channel so that you will be notify for future videos. 🙂

Korean Banchan Braised Quail Eggs

This braised quail eggs Korean banchan is well like by my family. This is the non-spicy version and thus it is kids friendly recipe.
Course Side Dish
Cuisine Korean

Equipment

  • 1 Pot

Ingredients
  

  • 30 Quail Eggs Use Precooked ones to save time
  • 10-15 Garlic peeled
  • 280 ml Water
  • 4 Kelps
  • 50 ml Korean Soy Sauce
  • 1 tbsp Cooking Sake
  • 1 tbsp Raw Sugar

Instructions
 

Treatment to Precooked Quail Eggs in brine

  • Drain the brine from the precooked quail eggs
  • Rinse the eggs
  • Add some water in a pot and bring to boil
  • Add the eggs and boil them for about 1 min
  • Remove the eggs and set aside.

Braising the Quail Eggs

  • In an empty pot, add these ingredients and bring them to boil
    280 ml Water, 4 Kelps, 50 ml Korean Soy Sauce, 1 tbsp Cooking Sake, 1 tbsp Raw Sugar, 10-15 Garlic
  • After boiling for 2 mins, remove and discard the kelps
  • Add the quail eggs and braise for 10 mins in medium heat. Gently stir the eggs around so that they have an even braised colour.
  • It's done! Transfer to an airtight container and store them in the fridge for up to 2 weeks.
Keyword banchan, Easy

Watercress with Honey Dates Soup

If you are someone who can’t resist fried and “heaty” stuff and late nights, this is a good and easy soup to help cool down your body “heatiness”.

You only need 2 ingredients – a bunch of watercress and 5 honey dates. And water! ?

I use electric cooker which has pre-set menu that slow boil the soup for 3.5 hours. You can also cook this over the stove for about 1.5-2.5 hours.

There’s no need to add meat for this soup! No need extra seasoning too as the honey dates give sweetness to the soup. We call it 甜汤 in mandarin. Easy peasy 🙂

Watercress with Honey Dates Soup

An easy soup to cook at home to cool down the "body heatiness" after excessive festive snacking!
Prep Time 5 minutes
Cook Time 3 hours
Course Soup
Cuisine Chinese
Servings 4 servings

Equipment

  • Electric Slow Cooker

Ingredients
  

  • 5 Honey Dates
  • 1 bunch Watercress
  • 2 big bowls Water

Instructions
 

  • Soak and wash the watercress thoroughly. Give the honey dates a quick rinse.
  • Bring the water to boil, and add in the watercress.
  • Transfer the honey dates, watercress and boiling water into an electric slow cooker. Cook for around 3-3.5 hours
  • You can also simmer over stove for about 2-2.5 hours

Notes

TIP : Watercress must be added into boiling water, otherwise the soup will become bitter.
Keyword Easy

Delicious Stir-Fry Minced Pork

You can never imagine how many dishes you can create using this stir-fry minced pork.

Using simple seasoning to marinate, this bowl of goodness is great for Teochew white porridge, dry noodles (干拌面), bibimbap and many more! You can substitute with chicken or beef too!

不要小看这碗炒肉碎,它可是能让你超级变变变!

Delicious Stir-Fry Minced Pork

BZMOMMY
Great to go with teochew white porridge, dry noodles, bibimbap and many more!
Prep Time 20 minutes
Cook Time 10 minutes
Cuisine Chinese
Servings 4

Ingredients
  

  • 300 g Minced Pork you can substitute with chicken or beef
  • 2 tsp Sugar
  • 2 tsp Sake
  • 2 tsp Korean Sesame Oil
  • 1-1.5 tbsp Soy Sauce
  • 2 tsp Spring Onions Sliced
  • 2 cloves Garlic Minced
  • 1 tsp Roasted White Sesame Seeds
  • 1 pinch Pepper

Instructions
 

  • Marinate the meat with all the ingredients & seasoning for at least 20 minutes. I usually let it sit for 2 hours.
  • Add a little cooking oil in a heated pan. Add in the marinated meat. Stir fry the meat in high heat.
  • Stir fry until the meat is cooked and visibly dry (not sitting in a pool of gravy).
Keyword Easy, Versatile

Easy Korean Street Toast Recipe

Do you miss travelling? I do, and I miss our South Korea trips. The street food and the bingsu are so delicious there! Whenever we miss the Korean Street Toasts, we will make them on our own at home! Sharing this simple recipe to you too! 🙂

Ingredients (1 serving)

?? 2 slices of Bread
?? 2 Fresh Eggs
?? 2 slices of Picnic Ham
?? 1/2 cup cabbage , thinly sliced
?? 1/2 medium size carrot, thinly sliced
?? Few slices of cucumber and tomatoes
?? Ketchup
?? Salt & pepper
?? Sugar
?? Butter

Preparation
1) Mix the eggs with cabbage and carrots. Season with some salt and pepper.

2) Add some oil in a heated pan. Put some of the cabbage/carrot/egg mixture into the pan. Shape it to the shape/size of the bread.

3) Once the bottom of the shape is set, pour some egg mixture on top so that the shape is fuller and nicely shaped.

4) Cook each side for about 2 mins on medium low heat.

5) Pan fry the ham on both side

6) Spread butter on both side of the bread. Pan fry both side. (You can also melt butter in the pan instead of spreading on the bread. I prefer spreading so that the bread is evenly coated with butter)

Assembling
? When the bread is still warm, sprinkle some sugar on the bread. Spread some ketchup on the bread.

? Place the ham, cabbage egg, cucumber, tomatoes in the sequence that you prefer. Add mayonnaise , chilli or mustard if you like them.

If you miss the Korean Street Toast too, try it! ??

Easy Banchan – Yeongeun Jorim (연근조림 Braised Lotus Roots)

I love banchan (반찬) – most are easy to prepare and can be kept in the fridge for a couple of days. There’s warmth and love-from-home feeling when you come back from work and open a fridge full of ready to eat banchan.

Lotus roots have a lot of good benefits – you can read it here. It’s easy to purchase from wet markets or the supermarkets. Lotus roots usually comes in 3-5 “joints” or tubers. For a small family like mine, I prefer to buy lotus roots in the wet market because I can chose and purchase the right size of root tube, instead of buying a pre-package of lotus roots in the supermarket which are usually too much for us to finish.

Making Yeongeun Jorim is simple because there’s only 1 ingredient to cut. However, the time spend at the stove is about 30-45 minutes. Especially at the last 10 minutes, I have to really stare at the lotus roots to make sure that they are not over caramelised. But it’s all worth it because of the good benefits of lotus roots, and a lovely banchan for the next few days. The greatest reason of all – the hubby loves it!

I followed the recipe from Korean Bapsang. It has a nice flavor, which gets better over the days. By the way, I am a great fan to Korean Bapsang‘s recipes as the flavoring and taste are closer to my family taste.

Try it!

Tom Yum Cream Pasta

The first time I came across Tom Yum Pasta was at Eighteen Chefs.  I didn’t dare to order it because my colleagues said that it’s quite spicy for them.  I am not someone who can take very spicy food, and most of my colleagues are spicy food lovers.  If the dish can make them go *sniff sniff*, it means that I will cry and kao tolong once the food gets into my mouth.

The second time I came across Tom Yum Pasta was at PastaMania.  I am not a fan of PastaMania but Dawn is. During one of the dinners, I ordered the Seafood Tom Yum Pasta and it was a great discovery! It was delicious and it changed my impression of PastaMania.

This is my 2nd attempt of my own creation of Tom Yum Cream Pasta, with Garlic Butter Prawns. Simply love the sour-ness and the spiciness just nice for me.

tom-yum-3

5.0 from 1 reviews
Tom Yum Cream Pasta
 
Author:
Recipe type: Fusion
Serves: 1 person
Ingredients
  • 3 cloves of garlic - chopped
  • 1 tablespoons butter (est)
  • 1-2 chilli padi, sliced
  • Shelled prawns
  • Pasta of your choice - Spaghetti, Angel Hair etc
  • 2-3 tablespoon of pasta water
  • Cooking Cream (about 100g)
  • 2 teaspoon tom yum paste - more if necessary
  • Chopped parsley
  • (optional) ¼ stalk lemongrass (the white portion), thinly sliced
  • (optional) 1-2 kaffir lime leaves, cut to small pieces
Instructions
  1. Cook pasta in a pot of salted water, until Al Dente. Drain and put under cold running water to stop the pasta from cooking further. Set aside.
  2. Set aside about 2-3 tablespoon of pasta water.
  3. Heat the pan, and melt the butter. Add in chopped garlic and do a light fry.
  4. Once there's a nice aroma, add in the prawns and stir fry till it is cook. Set aside the prawns
  5. With the remaining butter and garlic in the pan, add in sliced chilli padi and do a light stir.
  6. Add in the tom yum paste, lemongrass (optional), kaffir lime leaves (optional) and about 2-3 tablespoon of pasta water, mix evenly.
  7. Pour the cooking cream in and mix gently under low heat.
  8. (optional) You can add milk if you prefer more sauce.
  9. Add in parsley and mix evenly.
  10. Add in cooked pasta and mix the sauce together.
  11. Dish the pasta, place the prawns on the top and sparkle with some parsley.

I am so glad that I found a new taste for our home cooked pasta meal!

Noise

quote

Half of May past.. and it wasn’t a very good one. Had a super bad don’t-know-what-kind-of-virus that knock me down for a week, the younger one also had a strange fever with-no-other-symptoms that lasted a few days, the “stressful” exam period for the elder kid etc. And as if these are not enough, noises from different areas and people choose to add on.

Sometimes when things do not go well, they follow one after the other. And probably at this time before the mental starts to break down, it takes a person’s steel mind to see the good out of these.

No one really know the effort and pain you are going through. People will choose to use the past to haunt or hurt you if they do not get or hear what they want to. Just as when you thought that the past is behind and you want to leave that chapter behind, others who went through the past with you decide to remind you and use it to what and when they deem fit to. Is this, a form of emotional blackmail?

It’s hard to ignore the noise – most of the time. But sometimes you just have to. It’s takes courage to say “I have done what I should and I will still choose to do the same if time turns back and I have to make the decision again.”

I felt unjust in some situations that I am in. Words from a phone conversation that got twisted and translated to no-where-near-the-original-meaning to other audiences, implied sentences that was conveyed via whatsapp that till today when I re-read them, I still feel extremely hurt. However, I chose to keep silent because I reckon that no amount of explanation will be enough. And strangely, why do audiences expect an explanation? 왜 ?

Through these, the pillar in my life stood with me. He allowed me to cry and bawl and yet complain nothing about his wet shirt and shoulders. He extended his long arms and bear hugs instead of using words to comfort me. Though my heat aches, he has helped to make the ache somewhat palatable.

Ignore the noise. Because they are just noise.

My Flea History and Flea Market at Lucky Plaza 2016

It’s been a while since my last flea.  I started this “once-a-while hobby” since I was about 20, at the then famous Clarke Quay Flea Market. I can still remember we had to bid for a stall on a weekday evening, and we can choose between a non-aircon or an air-con stall. The crowd was mostly vintage lovers, uncles looking for value-for-money items or collectibles, tourists who happened to be staying near the area and once a while, young couples who loved a sudden find of pretty sandals or a good book going at $5.

Due to redevelopment, the flea markets there stopped, and it kind of shifted to Central Square Mall… and till now, I can’t remember whether I participated a flea there or not??! I seem to have lost some part of my memories…

In 2004 – 2007, Yahoo Auction became a very popular online marketplace. It was easy to use, time-saving, and less hassles comparing to lugging items to and from a venue.  Best of all, it’s free! No rent, no commission! Too bad it was not a sustainable business for Yahoo, and it stopped.

And I was caught up with life…and the “rubbish” piled up, thrown and got piled up again.

Qoo10 started in 2008/2009, and I used that platform to try selling generally new unused items. However, as their market strategy was for commercial platform and not to be a marketplace like Yahoo Auction, I shifted my mindset too and started my small online business.

But my “rubbish” was not forgotten…and it’s piling up every month. Don’t ask me why I have so much “rubbish”. Things that I have no use for (even for new bags or clothes which I don’t use for whatever reason), could be a junk or rubbish to me, but it’s someone else treasure. I always hold on to the 3Rs and will try to recycle or reuse whatever I can, to do my small part in saving this earth.

In 2013, after the kids got a little older and having good in-laws who helped us looked after them, I started looking out for flea markets again.  “For Flea Sake” started sometime in Year 2010 and got popular with the fleas which they organised in Scape. Scape used to be a quiet area inside Orchard, but the fleas changed it to be a popular weekend place for young couples and tourists. I participated once in the Scape Flea Market, the sales wasn’t really good, it was hot and the space was tight.

Scape Flea

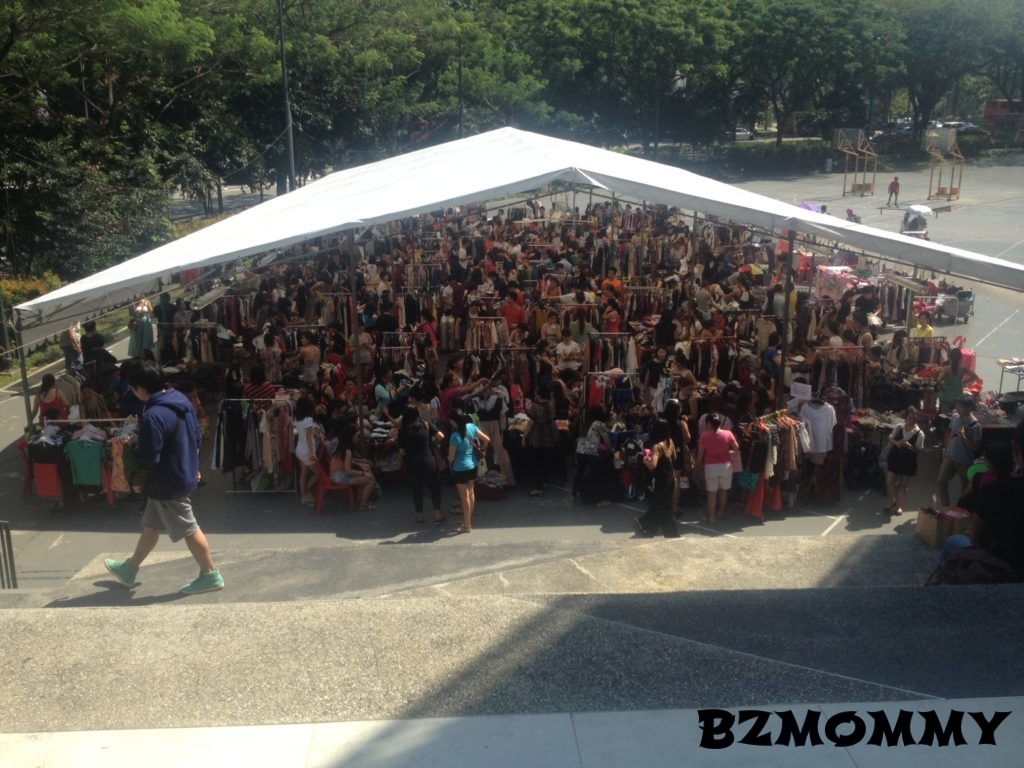
Picture provided by “For Flea Sake” when I booked the stall

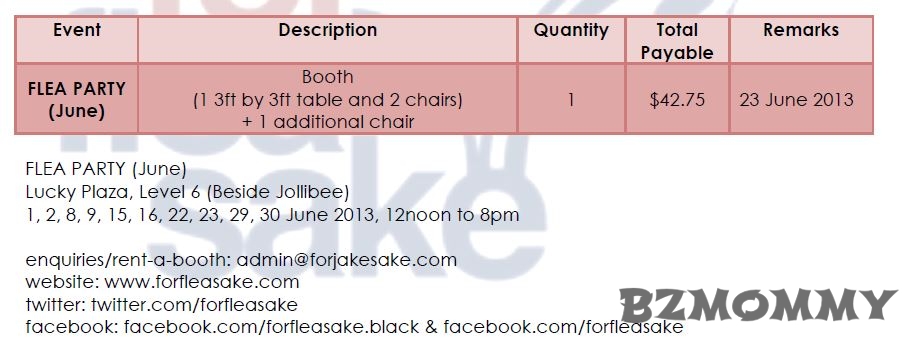
For Flea Sake also started with another flea venue at Lucky Plaza, and I was quick to jump on their initial promotion where their rent was only $42.75 after a 5% app discount. The crowd there was crazy! It was a “profitable” experience, and it was not as hot as I was in Scape.  I sold most of my items and was happy that the items finally have new owners who see the value in them. But like many online reviews that you can find, the place was dusty, warm even with aircon but who cares really? The crowd and ready buyers were mountain-ful. Hubby and I weres dead tired after the flea at 7pm.

Flea party 2013

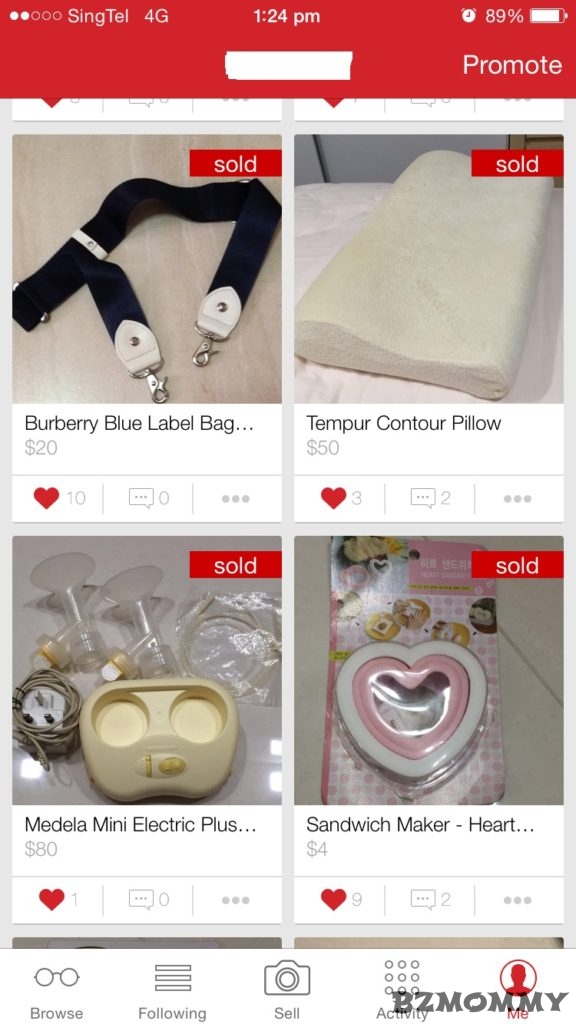
After this, Carousell got popular and everyone were excited because it’s a good app to sell second-hand item.  For those who used to love Yahoo Auction, Carousell was like a “finally you come back” kind of feeling.  Yay! Another way for me to find new owners for my poor un-loved-by-owner items. I am using this since 2014 till now and happy that I had helped to reduce items at home.  Even my mom and sisters were amazed!

IMG_2317


This year, my colleague “jio” us to go flea market at Lucky Plaza and 3 of us shared 2 stalls.  The rent had became $160 for a Sunday stall.  It seems that there were 2 flea area – one opposite Jollibee (the one I first went in Year 2013) and the other at beside Jollibee. In April 2016, the one opposite Jollibee were not available for booking anymore, and they had a “early bird promotion” at $120 per stall for the one beside Jollibee. So thank goodness for my colleague sudden in-prompt decision! 🙂

Screenshot taken from Fleawhere website

Screenshot taken from Fleawhere website

So while the experience over the weekend is still fresh in mind, I think I should write down on my “renewed” experience of flea market in Lucky Plaza –  the flea area beside Jollibee

  1. This area is definitely hotter than the one opposite Jollibee. It felt cool in the morning, but trust me, the place turned into a hot oven when the flea starts at 12pm+.
  2. The organiser’s notes will state that there should not be queuing before the start of the flea. However, when my colleague reached there at 9.45am, she was already the 3rd in queue. If you have a spot in mind, do reach early to queue.  However, if any table is fine to you, just reach around 11+, you will still get a table as well. The area is small, so the potential customers will still go to any tables with good deals.
  3. Yes, you can queue with your items.  Just do not start selling while queuing.  There are potential customers who will express interest. And there are also watchful eyes who are the event organizers.
  4. Queue starts from the wooden door beside the lift lobby, not from the glass door.
  5. The space seems tighter and the tables given were smaller in width but longer in length (compared to those wooden 3ftx3ft table)
  6. We were allowed to go in at 12pm.
  7. There’s no time for table cloth or anything fanciful..just open whatever you have and start selling. (I have to state this because one of my colleague brought “table cloth” – I forgot to tell them that there was no need to).
  8. Have a heavy breakfast or take turns to eat while queuing. EAT BEFORE 12pm.
  9. Bring : Face masks, Eye Drops, Wet Tissue, USB/Portable Fan, Tissue & Water for yourself. I don’t suggest wearing contact lenses, so put on a pair of specs instead. For those who doesn’t need to wear specs, maybe a pair with no degree will help protect your eyes. Make sure you bring along the specs cloth to clean your specs after the flea.
  10. The place is SUPER dusty and dirty. That explains the face masks, eye drops, tissue and wet tissues.
  11. One of my colleague had USB Fan and it was a saver! But it also mean while it helped to cool us down, the dust get blown into our airway and eyes more than anyone else.
  12. Don’t need to buy new plastic bags, just collect those old paper or plastic bags that you have at home and bring many of them.
  13. The potential customers are mostly helpers from Philippines and Indonesia.  I had a couple of Chinese speaking customers and some locals as well. In the late afternoon, I saw a few men as well.
  14. Crowd started to reduce at about 6pm + but there are still buyers.  I can’t leave because these people keep coming and I had to abruptly close my boxes. 😀
  15. Don’t worry about not clearing anything. My colleagues were worried and the thought of lugging back the things home was uncalled for.  Unless you are being unrealistic of selling the items at a high price, most items will surely find new owners. After deducting the rent, you probably will take back between $150-$350, depending on the amount of things you have to sell.
  16. If you are driving, park you car elsewhere and not in Lucky Plaza. However, if you like the “convenience” or a ready place to go if you feel faint, the carpark fees from 10am-7pm is about $23. So do your maths.

What Sells there?

  1. Clothes – Men’s clothes inclusive. Children too. Average brand clothes such as Espirit , Mango, etc with labels sell well. However, if you can’t let go your clothes as low as $1, then don’t bother to bring. Prices usually start with $5 each or 3 for $10…and eventually those not very pretty clothes will be left… then that’s the time the prices will drop to $2  then $1. So unless you want to pick the nice clothes out and lug home before you reduce the prices, if not, only bring clothes that you can let go at a cheap price. Children clothes between age 2-10 >> Good!
  2. Accessories – Used or new. As long as it’s cheap and still wearable…price is about $2-$1
  3. Shoes – Depending on condition and brand, the price is about $10-$5.  I sold some old children slippers at $3 each.
  4. Bags – Branded or no brand, new or used…all can. Of cos the “branded” ones will fetch higher price.$10-$5. Small coin pouches and medium size cosmetic pouches sells well too $2-$1.
  5. Soft toys – this is a surprise to me…Palm size soft toys at $2 each (which later I sold some off at $1). Some soft toys are new but alittle dusty…but I am glad that they have new owners!
  6. Cosmetics – ready buyers but Carousell will probably fetch a higher price..
  7. Keychains – surprise again! For something which I had abundant of (due to past fleas), I sold about 20 pcs of the keychains and left probably 5. Happy!

My golden rule #1 : if there is something that can fetch higher price in Carousell, then don’t bring to this flea market. 

My golden rule #2 : If you think that the item can fetch higher price in Carousell, but it had been there for months and no one is buying it, then you can try to get rid of them cheaply in the flea market.

Bye to Flea for now…can’t go for another one soon as I don’t have much left to sell to cover the rent 🙂